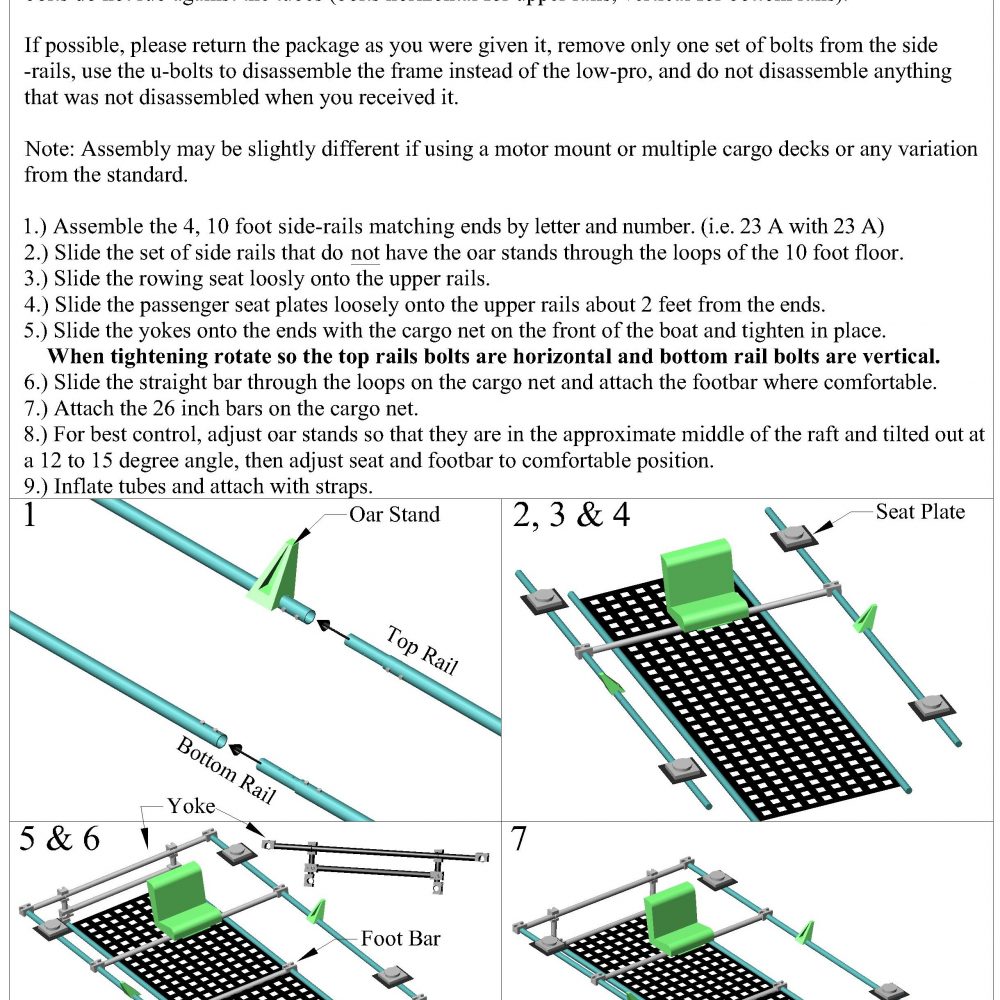
Cataraft Assembly
|
(Click on images to enlarge)
Components 4-side rails with break downs 8 pieces 5’ each for 10’ frame or 4’ each 8’ frame
4-verticals with low pro fittings and ubolts 14” high
3-bottom cross rails 41” wide (1 middle, 1 front, 1 rear) 3-1 upper cross bar with rowing seat 1 front and 1 back cross bar 72” each 2-oar stands with oarlocks
Ubolts, washers, nuts and low pro fittings
(Do not remove low pros from frames only the ubolts, tighten ubolts evenly or they will break)
16-1 to 4 foot straps
· You will need a Frame wrench or socket wrench with a ½ inch head (rentals frame wrench is in repair Kit) Steps 1 connect side rails
each side rail is stamped by the breakdowns with 1, 2,3, and 4 dots by the male and female connection. (be sure to match the male and female side rail with 1 dot to each other, repeat with the other rails matching 2 with 2 and 3 with 3 and 4 with 4.
bolt together (Never remove the bolts on the inserted sleeve or breakdown connection that secures the sleeve to the rail). Step 2 lay rails as shown slide on back top cross bar at the break down connection. Make sure the nuts on the top rails are horizontal (if they are vertical they will rub a whole in your tubes)
Step 4 adjust seat bar general rule is 18 inches from the oar stands
Step 5 attach verticals to top front and back cross bars as shown, it is important to make sure the ubolts are positioned so the flat part of the bolts are against the tubes of the raft.
16 ½ “ from center of top rail. Crossbars are marked
Step 6 attach cargo floor as shown through both bottom side rails
Step 7 attach bottom side rails to the verticals
Step 8 attach the bottom cross bars and foot bars Step 9 attach the cargo floor to the cross bars and foot bars with zip ties provided or lace with parachute cord Step 10 square up frame and tighten Step 11 attach frame to tubes
set frame so inside D-rings are just inside the corner of the front and back frame lo-pros and just below the bottom cross bars next attach a short 1 or 3 foot strap to the inside Middle D rings first.
(This will keep your tubes parallel to each other and not bowed in or out) next attach 3 or 4 foot straps to the out side middle D-rings then the inside front Step 11 continued and back then outside front and back yourstrap buckles should be positioned as shown so not to rube on tubes
Cargo module Attach the 3 short bars to the front of frame cross bar next attach long bar with ubolts next attach the mesh or board pending on package
First attach loop strap to each side of frame as shown next lay the mesh as shown then fold over the ends around the side bars and weave the ends together as shown then pull tight. You should also weave the front and back of mesh to the frame. |


